How to Connect to NovoConnect through Airplay

The MacOS version 26.1 has changed the method of Airplay screen projection. Please follow the instructions to project your screen through airplay.

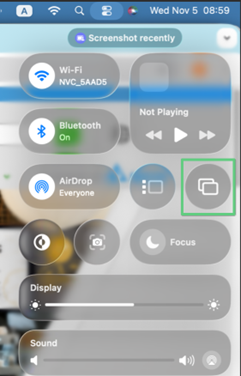
Step 1: Go to the top-right corner and click the Wi-Fi icon. Ensure your Macbook’s Wi-Fi settings and the NovoConnect device are on the same network, or directly connect to the NovoConnect hotspot(e.g., the NovoConnect device name is NVC_5AAD5)

Step 2:Then, click the Control Center icon in the menu bar, select Screen Mirroring. and choose your desired device form the list.

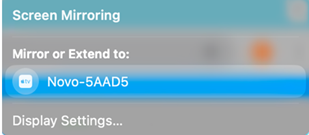
Step 3: Choose your desired device form the list, (e.g., the NovoConnect device name is NVC_5AAD5).

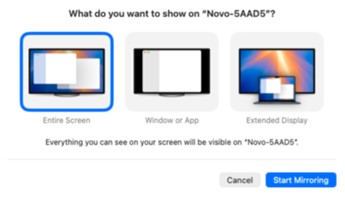
Step 4: After selecting desired device, you will need to click Change or choose Content. In the dialog, that appears, select Entire Screen, Windows or App or choose Extended Display.


How to Reset Device’s Password – NovoDS Studio

This article is applicable for models DS110, DS210, and DS310.

The device password can be reset if it is forgotten.

To prevent any unexpected operation, the clearing process is secured. You must first collect the target device’s MAC address and submit it to the Vivitek service center. The service center will then issue a BIN file necessary for the cleaning process.

After obtaining the BIN file, please adhere to the following instructions to clear the device’s password.

Step 1: Launch the NovoDS Studio PC software and go to the DS Devices page

Step 2: Select the target device, then click Connect icon to establish a connection.

Step 3: Click Setup icon. A Input Password dialog will then pop up.

Step 4: Click the link Forget password? Reset to begin the password reset process.

Step 5: Select the BIN file and upload the file to the target device to reset password.

If you encounter any problems when using our products, please fill the form and attach the logs through Contact Us, we will arrange assistance for you as soon as possible.


Remote Manager: On-Premises Update

This function is applicable for NovoConnect, NovoTouch and NovoDisplay.

In this article, we will guide you how to perform manually firmware update by Remote Manager.

Preparation

  • Network connection

Make sure all the devices are under the same network as your PC connected.

  • Remote Manager

Click here to download Remote Manager.

  • Firmware file (.npkg)

Important:

To avoid critical damage or permanent device failure, do not shut down or restart your device during the update process.

Step by Step Guide

  1. Firmware Update” is located at the Top-Left menu of Remote Manager, Click it to enter firmware updater.

2. Select the target device(s) by tick the checkbox and click “On-Premises Update” to continue.

3. Browser and select the firmware file (.npkg), then click “Apply”.

4. Click “Apply” to start the updating after the firmware information is confirmed.

5. Waiting for package extracting is finished.

6. Verifying the package and starting to upgeade firmware.

7. Firmware update is completed successfully.

Now you can go back to the device list by click “Done” at the Bottom-Right corner, and check the details of the device which just completed firmware updating.


How to collect device logs – NovoDS Studio

This article is applicable for NovoDS Studio.

Get software

Go to NovoDS.com > Resource > Software

Connecting to a device

Run NovoDS Studio and switch to Device Management page.

Select the device and click on Connect to connect the device and perform more operating.

Log downloading

Click on Device Log after device is connected.

There’re two kind of Device Logs

  • App Log – It contains NovoDS App’s process since it is running. Usually uses for software debug.
  • System Log – It contains the most processes of Novo device since it is starting up. Usually uses for software and hardware debug.

Send a Feedback

If you encounter any problems when using our products, please fill the form and attach the logs through Contact Us, we will arrange assistance for you as soon as possible.


Network Ports Used by NovoConnect Devices

Network ports are TCP/IP-network-based device communication end points, through which the communications between a NovoConnect device and its client devices (e.g. laptops, tablets, etc.) are achieved. The following Excel sheet has all the details.


Firmware Update with a USB Drive (for NovoTouch EK-1)

Important:

  1. This document is applicable to NovoTouch EK series, including EK650i, EK750i, and EK860i.
  2. Each EK model has its own upgrade package. Please make sure you download the correct package for your model. Using a wrong package could make your NovoTouch unable to boot up.

Step-by-step instructions:

  1. The upgrade package is stored in a folder called “upgrade_551”. When you receive the firmware upgrade package, typically you need to unzip it first and then copy folder “upgrade_551” onto a USB disk. You should see the following file/folder structure on the USB disk.
    This image has an empty alt attribute; its file name is fig-1-2.png
  2. Power down NovoTouch panel.
  3. Insert the USB disk into the USB port at the front panel of NovoTouch panel.
  4. Press-and-hold button POWER until the LED flashes red and blue quickly, indicating the upgrade process is started. Please do NOT remove the USB disk during this process.
  5. A progress bar is shown to display the completion percentage. Once it gets to 100%, the NovoTouch will restart automatically. During this first-time boot-up, it will take a bit longer to perform some additional post-processing.
  6. Once it fully boots into Android home screen, the firmware upgrade is completed. Now you can unplug the USB disk.


Firmware Update with a microSD Card (for NovoConnect and NovoDS series)

Important: This article is applicable to the following Novo products:

  • NovoCast, NovoConnectPro and NovoEnterprise
  • NovoConnect NC-X300
  • NovoDS mini, NovoDS and NovoDS 4K

For the sake of simplicity, we use NovoConnectPro as an example in the following descriptions.

Please use an 8~32GB (SDHC)micro-SD card during this process.

Step 1. Copy the upgrade files to a Micro SD card. You should see the following file/folder organization.

Folder Structure – Firmware Update for NovoPro and NovoDS

Step 2. Insert the Micro SD card to NovoPRO or NovoDS. Then reset (or cycle the power of) the device. After it boots up, you will see the following screen, indicating firmware upgrade is in progress.

Firmware Update Started – NovoPro & NovoDS

Step 3. After a minute or two, the upgrade process is done. You should see the following screen. Remove the Micro SD card and the device will reboot by itself.

Firmware Update Completed – NovoPro & NovoDS

This first reboot after the firmware upgrade takes longer than usual (roughly 2 minutes) as it takes the extra time to finalize the new firmware. At the end of this reboot, you should be able to see the NovoPRO or NovoDS’ home-screen.