DS110 and DS210
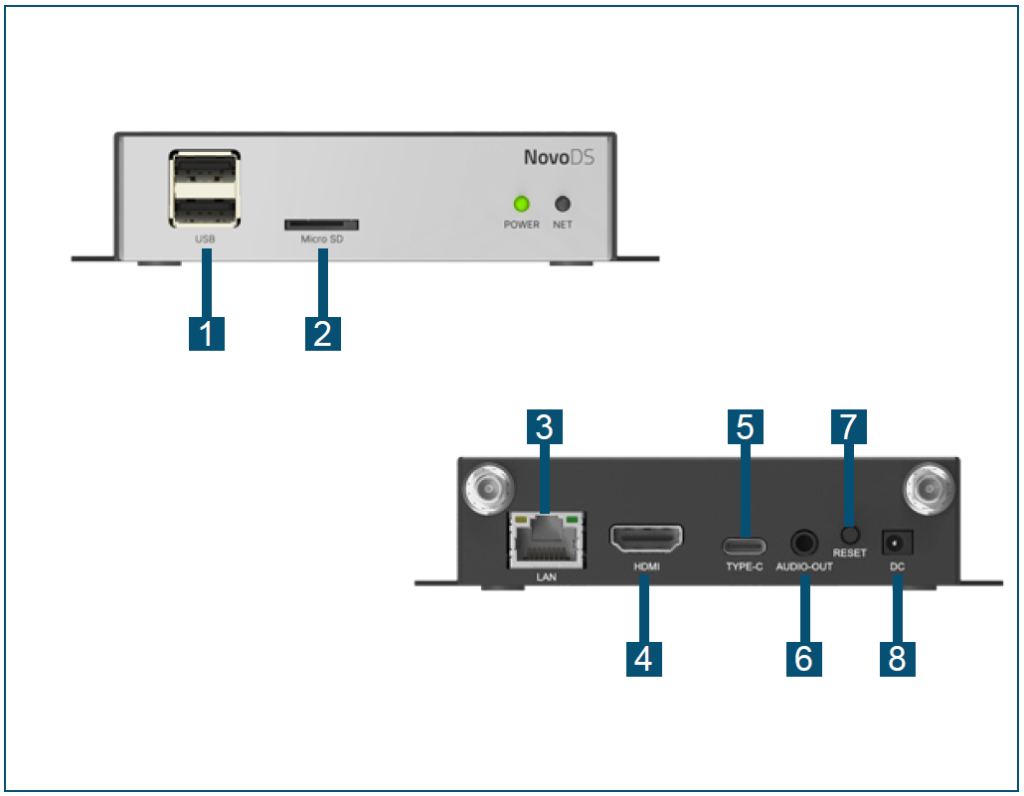
| Port | Function | |
| 1 | Port USB-A | USB mouse/keyboard and USB thumb drive |
| 2 | microSD Card Slot | microSD card for additional storage |
| 3 | RJ45 Port | Ethernet connection |
| 4 | HDMI Port | Display output |
| 5 | Port Type-C | USB mouse/keyboard and USB thumb drive |
| 6 | Audio-Out Jack (3.5mm) | Stereo audio output |
| 7 | Reset Button | Device reset |
| 8 | DC 5V Power Jack | Power input |
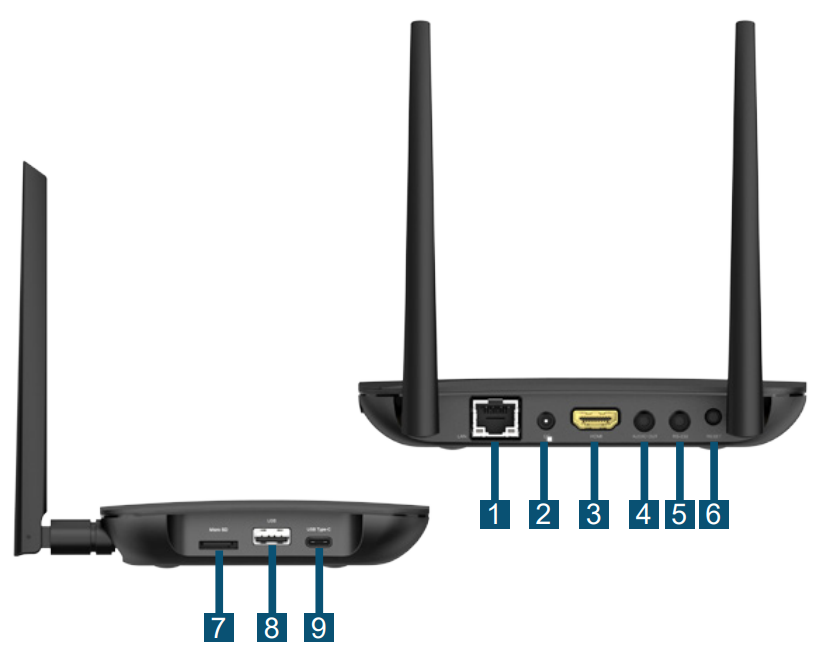
DS310

| Port | Function | |
| 1 | Port USB-A | USB mouse/keyboard and USB thumb drive |
| 2 | microSD Card Slot | microSD card for additional storage |
| 3 | RJ45 Port | Ethernet connection |
| 4 | HDMI-In Port | Display input |
| 5 | HDMI-Out Port | Display output |
| 6 | RS-232 (3.5mm) | RS-232 serial data |
| 7 | Port Type-C | USB mouse/keyboard and USB thumb drive |
| 8 | Audio-In Jack (3.5mm) | audio input |
| 9 | Audio-Out Jack (3.5mm) | Stereo audio output |
| 10 | Reset Button | Device reset |
| 11 | DC 5V Power Jack | Power input |
| 12 | GPIO | GPIO ports for hardware extension, such as connecting to inputs like buttons and sensors, and/or, outputs like LED lighting and motor control. (1) The pin-out definition is shown in the picture below. (2) Connector type: Phoenix (3) Pin pitch: 3.81mm (0.15″) |

DS301
| Port | Function | |
| 1 | RJ45 Port | Ethernet connection |
| 2 | DC 5V Power Jack | Power input |
| 3 | HDMI Port | Display output |
| 4 | Audio-Out Jack (3.5mm) | Stereo audio output |
| 5 | RS-232 Jack (3.5mm) | RS-232 control port |
| 6 | Reset Button | Device reset |
| 7 | microSD Card Slot | microSD card for additional storage |
| 8 | USB-A Port | USB mouse/keyboard and USB thumb drive |
| 9 | USB-C port | USB mouse/keyboard and USB thumb drive |
Connecting NovoDS Devices to Display
Step 1 : Connect the NovoDS to a display via the HDMI output port
Step 2 : Connect the AC-DC power adaptor to the DC 5V power jack
Spep 3 (optional) : Connect an Ethernet cable to the RJ45 port (if you need to use LAN connection)
The device comes with a mounting bracket. Typically you can use it to attach the NovoDS device to the back of the display or on the wall.


