To display a count of people within a given space (e.g. the number of customers in a store) using a People Counting camera, click the people counting button in the bar to the left of the content menu, and the video in menu will appear. Follow the instructions below to configure the display settings for the people count.

- In the Store Hours field, select whether the store features an opening time or if the store is open 24 hours. Once you select an option configure one of the following settings:
- For Open at, set the time at which the store opens.
- For 24 Hours, select Restart counting if you want the count to restart at a given time, and then set the time at which the count is reset.
- In the Initial count field, set the number at which the count starts at.
NOTE: This option is for use if you have a given number of staff members already present during opening time which you want to include in the count. - In the When reached full occupancy… field, enter the description (e.g. “Full”, “100% Capacity”, etc.) to be displayed when the maximum occupancy number is reached.
- In the Maximum Occupancy field, select the number for the maximum occupancy.
- In the Message field, enter the text indicating the maximum occupancy number.
- In the Welcome-in Message field, enter the welcome message text you want to be displayed.
- In the Full-Occupancy Message field, enter the instructions (e.g. “Please wait”, “Take a number”, “Leave Contact Info”) for customers you want displayed for full occupancy.
- In the Text Color field, choose from either several preset colors or select a custom color for the text of the counter.
- In the Font field, set the font for the text. To use a font not included in the drop-down menu, click the more button ( ) and upload the font you want to use.
- In the Background Color field, choose a transparent background, or a preset or custom color for the background.
- (OPTIONAL) In Background Image field, click the more button ( ) to add a background image in the layout item/box for the feed and upload the image you want to use.
- In the Counting Camera section, click the add button ( ) to add the camera that will be used to count. Once you click the add button you will have to enter the following parameters for the camera:

- IP Address
- Account name
- Password
- Analytics Rule
13. Click Save to finish configuring the people counter.
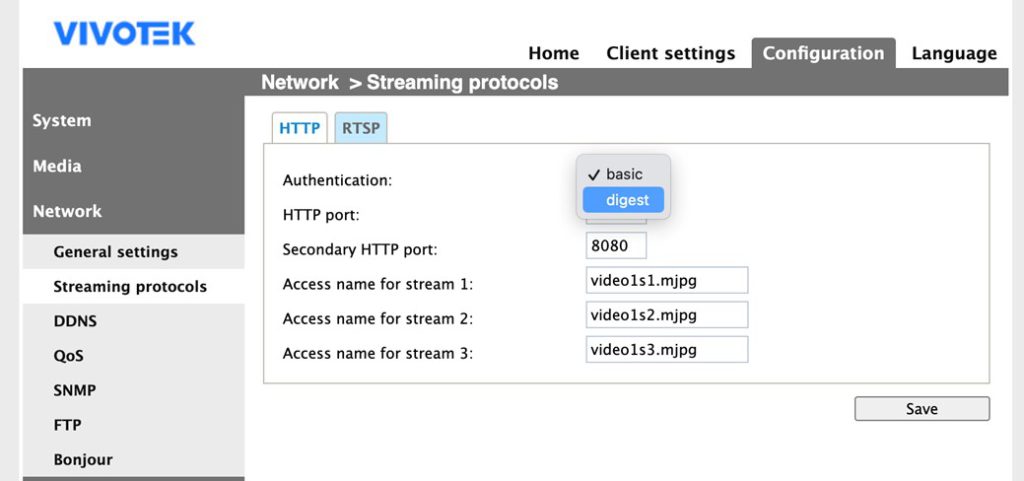
Follow the instructions below to configure “Authentication” of Vivotek People Counting cameras.
- Go to camera configuration page
- Network ->Steaming Protocols -> Authentication -> select “basic” as authentication method.

Supported People Counting cameras:
| Brand | Model |
| Vivotek | SC8131 |
| Vivotek | SC9133 |

