Interactive Playlists
NovoDS model DS310 features an 8-pin GPIO port designed to receive inputs from devices such as buttons and IR sensors, and/or to output control signals for managing lighting and motors, among other functions. This capability renders it well-suited for developing interactive signage applications.
Interactions within signage are recorded in a playlist referred to as an “interactive playlist.” These interactive playlists closely resemble regular playlists, with the key distinction being the activation of the “Interactive Content.” Activating this setting enables users to configure GPIO, define startup sequences, and establish interaction rules. The remainder of this article will delve into these topics in depth.
1) Creating a Multi-Page Playlist
The procedure for creating an interactive playlist mirrors that of creating a regular playlist. This involves:
- Selecting model DS310 exclusively
- Choosing a layout
- Determining the screen orientation
- Developing the signage content using various media, web pages, weather updates, etc.
- Interactive playlists typically incorporate multiple pages to facilitate interactivity. The common practice is to switch display content to a different page when an event occurs. For instance, pressing the fire alarm button triggers the signage to display a “Fire Alarm” message, replacing the regular content.
2) Enabling “Interactive Content”
In the playlist editor, you can find “Interactive Settings” at the top menu bar. Click on it and you can see option “Interactive content“.

Once you enable “Interactive content”, you will be able to configure GPIO and Startup page.

3) Configuring GPIO
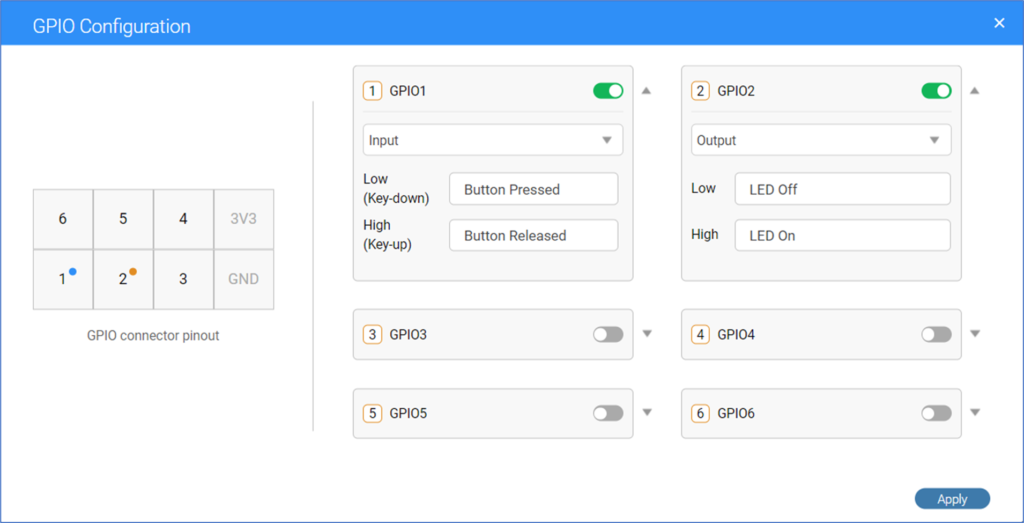
Clicking on “GPIO configuration” will bring up the configuration menu. On the left-hand side of the menu is the pinout of the GPIO connector, while the right-hand side features the configuration area.

In the example above, GPIO1 is configured as a button input, while GPIO2 is set as a control output to manage LED lighting (for turning on/off). It’s worth noting that input events and output signals can be renamed according to preference.
Once these configurations are finalized, simply click on the “Apply” button.
4) Configuring Startup page
When starting a playlist, two options are available.
- Always start with a specific page (like “page 1”)
- Conditional startup, which involves checking the status of a GPIO input to determine the content to be played. For instance, if a sensor detects nearby objects, it would display a “Welcome” message and activate the lighting.
Follow the on-screen instructions to finalize this step.

5) Defining Interaction Rules
Finally, it’s essential to define Interaction Rules, specifying the actions to be executed when certain events occur. Each page has its own set of Interaction Rules, which can be accessed by clicking on the “Interactive Page Settings” icon.

Rule definitions are straightforward and intuitive. For example, the following configuration is self-explanatory:
- When the “Button” is pressed, switch to “Page 2” (i.e., begin playing “Page 2”) and simultaneously turn on the LED.
