9. Server-Mode Deployment – Remote Manager DB Server
INTRODUCTION
“Remote Manager” used to be a standalone Windows/Mac application that enables system
administrators to manage multiple NovoConnect devices from a single PC, making it ideal for corporations, schools or other institutions. As a matter of fact, it is widely used by the IT administrators of various organizations.
Remote Manager takes a step further by introducing two operation modes
1) Standalone Mode. In this mode, software works the same way as the “old” Remote Manager.
2) Server Mode. This is used to deploy in server environment.
The new Server Mode brings along the following new capabilities.
● LDAP integration (such as Microsoft Active Directory (AD))
● SSO (Single Sign-On) support1
● Centralized NovoConnect device list
This leads to some key benefits for users
● Nowadays most organizations deploy LDAP service and enable SSO support. With tight integration of LDAP and SSO, Remote Manager v3.0 dramatically improves its deployment flexibility, security, and usage convenience.
● With NovoConnect device list stored in a central server, IT administrators no longer maintain
multiple copies of the device list in several computers. This leads to accuracy and efficiency.
This document describes how the Server Mode works, and how to set up the corresponding new services.
Note: For Standalone Mode operations, please refer to NovoConnect user’s manual, see this article.
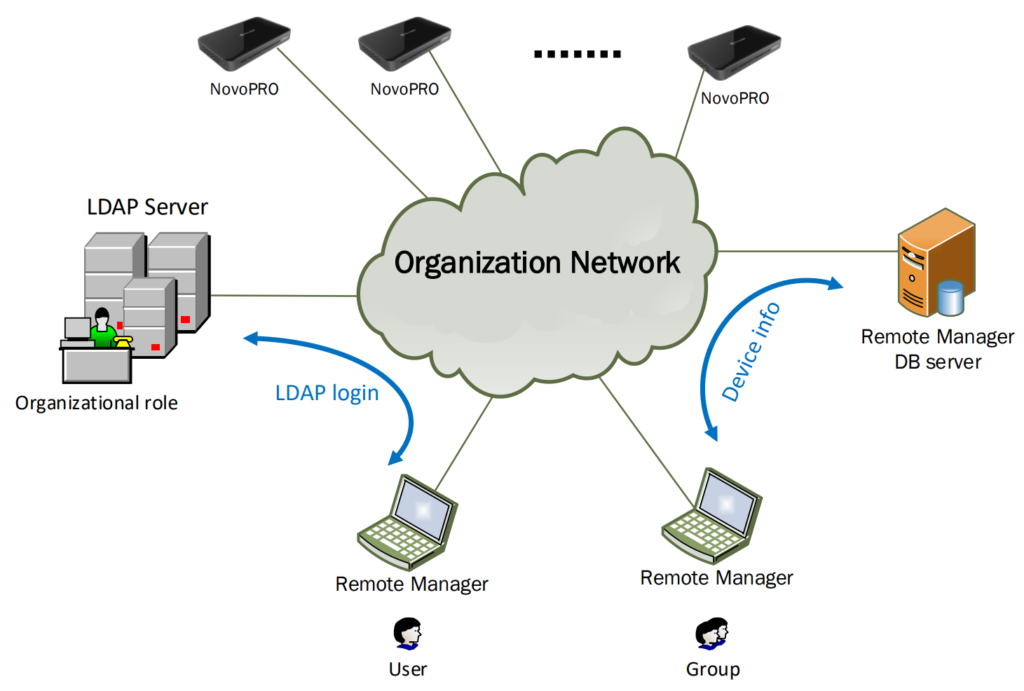
OVERALL DIAGRAM
Remote Manager consists of two components
1) Remote Manager software (running on Windows and Mac PC)
This is the front-end software which users will install on their personal computers and gain
access to Remote Manage DB Server.
As mentioned in previous section, this software component can run by itself (Standalone Mode) with the same functionalities as the “old” Remote Manager.
2) Remote Manager DB Server (running on Windows server)
This is the server program managing users and the NovoConnect device list.
The following diagram illustrates the overall picture.
● IT administrators set up accounts in “Remote Manager DB Server” for users who are assigned to manage NovoConnect devices.
● A user can choose to login in its LDAP server, and his/her credential will be validated by the organization’s LDAP server.
● If SSO is chosen, his/her OS login credential will be used.
● Once the credential is validated, the user will be able to manage NovoConnect devices, like add, delete, change status, etc. Changes will be stored in Remote Manage DB Server.
SETUP – Remote Manager DB Server
Step1. Download and Install Remote Manager DB Server application on a server.
Step2. Once it is launched the very first time, the application asks you to create a Power User account who will be responsible for managing this DB server.
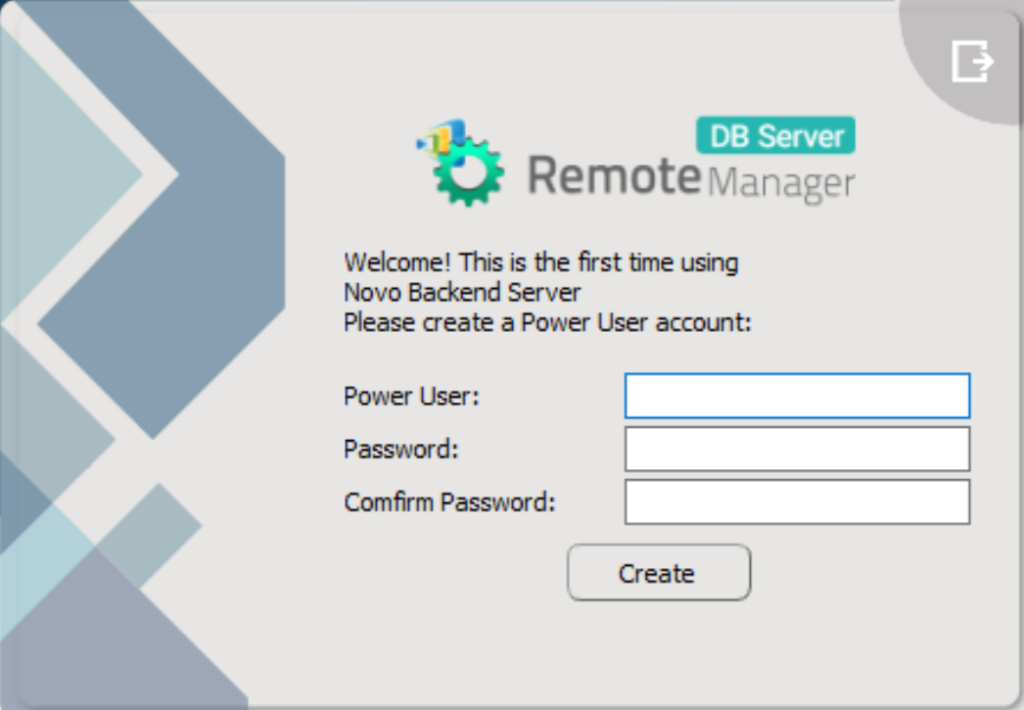
Step3. After creating the credential for the Power User, go to Preference for more configuration.
If you would like for users to log into Remote Manager DB Server as “AD users”, toggle the Enable AD Certification. This will bring up three more settings.
| No. | Item | Description |
|---|---|---|
| 1 | Server Port |
Server Port indicates which port you want to communicated with. Select port 389 (simple bind/SASL bind for SSO/Single Sign On) or port 636 (TLS/SSL) for desired authentication methods. |
| 2 | Server URL |
Server URL indicates the URL associated with your AD server. A protocol prefix (“ldap://” or “ldaps://”) will be added automatically depending on the Server Port you choose. ● “ldap://” corresponds to server port 389 ● “ldaps://” corresponds to server port 636 |
| 3 | Base | Base indicates the LDAP querying base where a user MUST be located. |
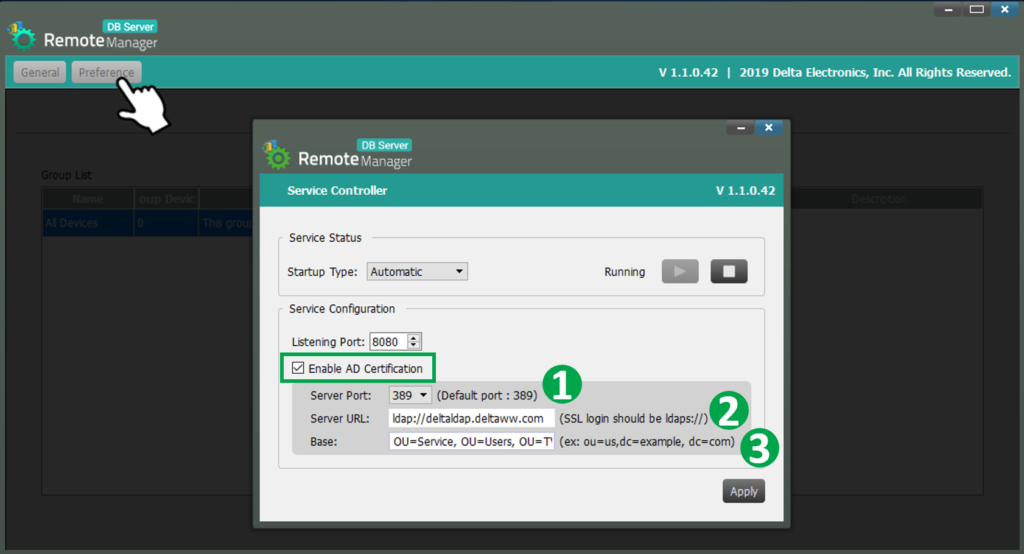
Step4. Click Ok after all settings are done, and then the application will restart to apply the changes.

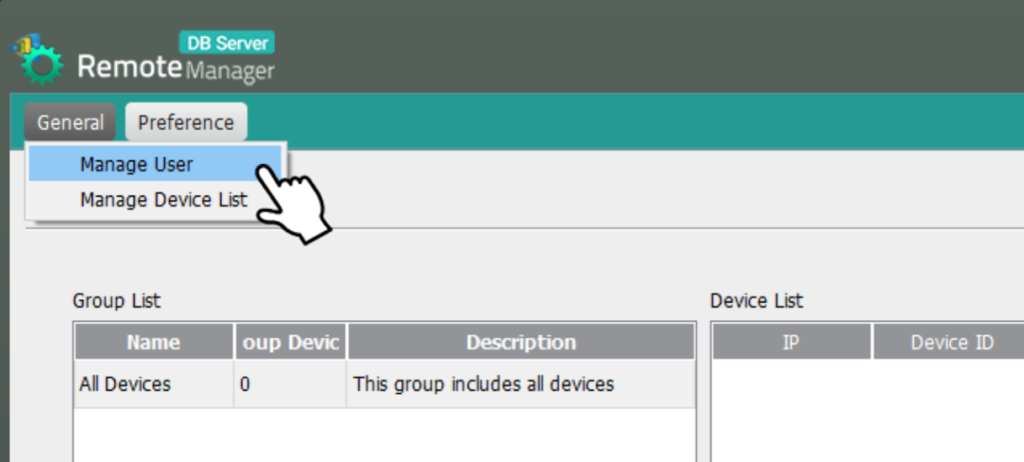
Step5. Once you log in as the Power User, go to General > Manage User > to create accounts for other users.
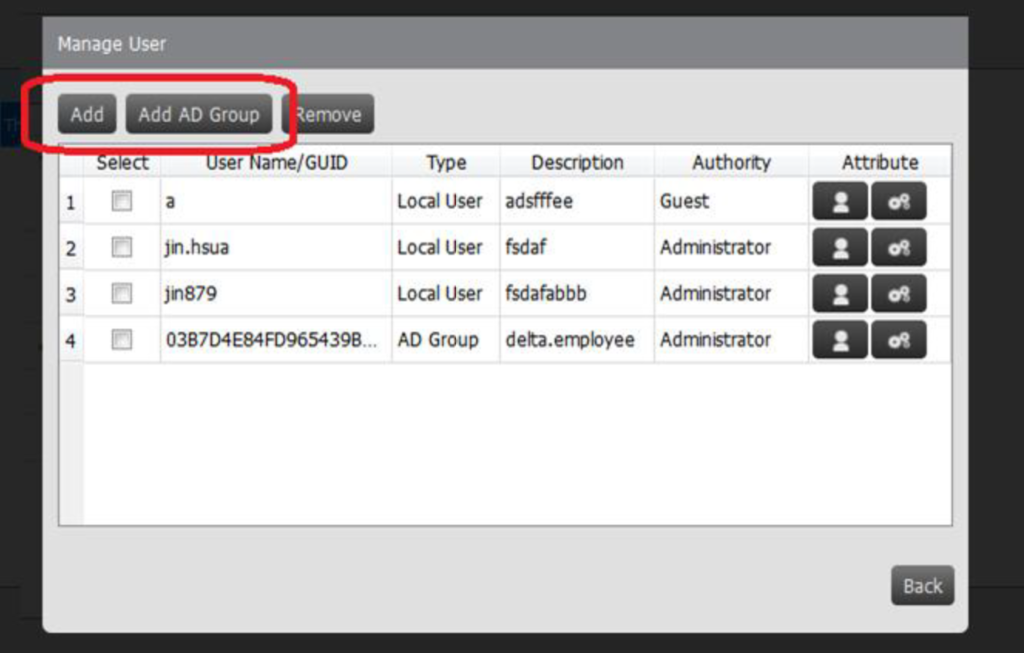
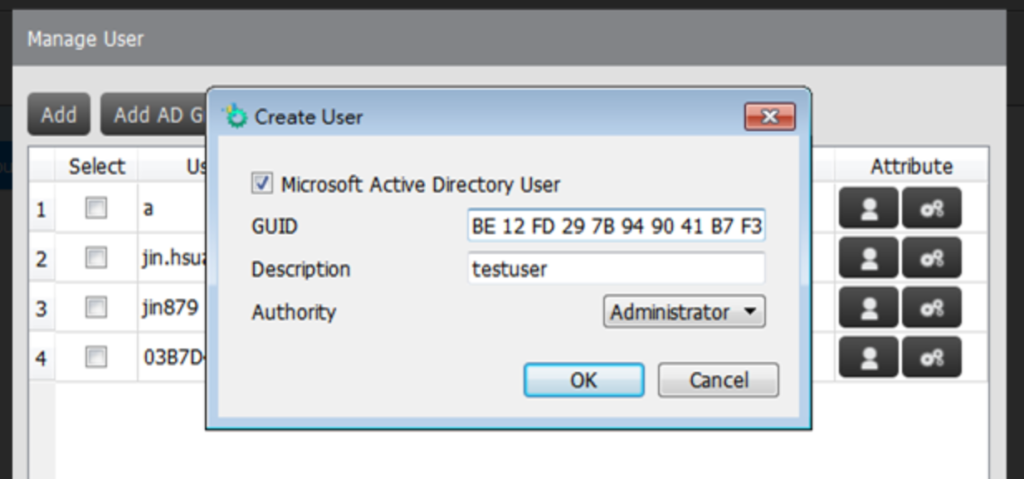
Add AD User: If you want to add an “AD User” who can log in as an AD Domain User via Remote Manager, check the “Microsoft Active Directory User” and input GUID corresponding to this user on the AD Server.
Add AD Group: If an AD user belongs to an AD group, you can simply add that group and treat that user login by group identity without adding each user’s GUID one by one. This function provides a convenient method to manage user accounts managed by the AD server.
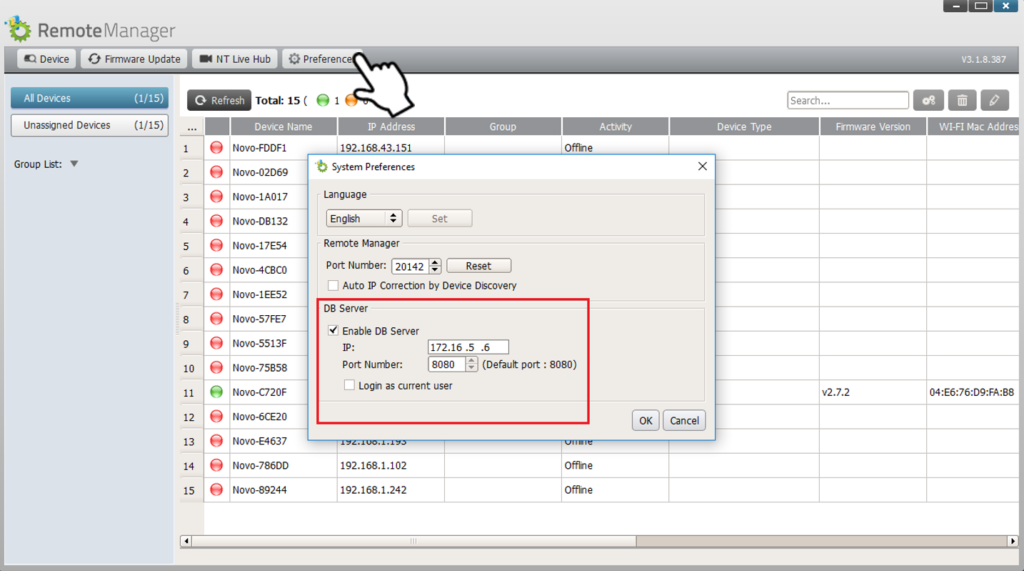
SETUP – Remote Manager Software
Step1. Download and install Remote Manager software with the version v3.0 above.
Step2. Launch the application, go to Preference >under DB Server section, toggle Enable Backend Server Data Exchange.
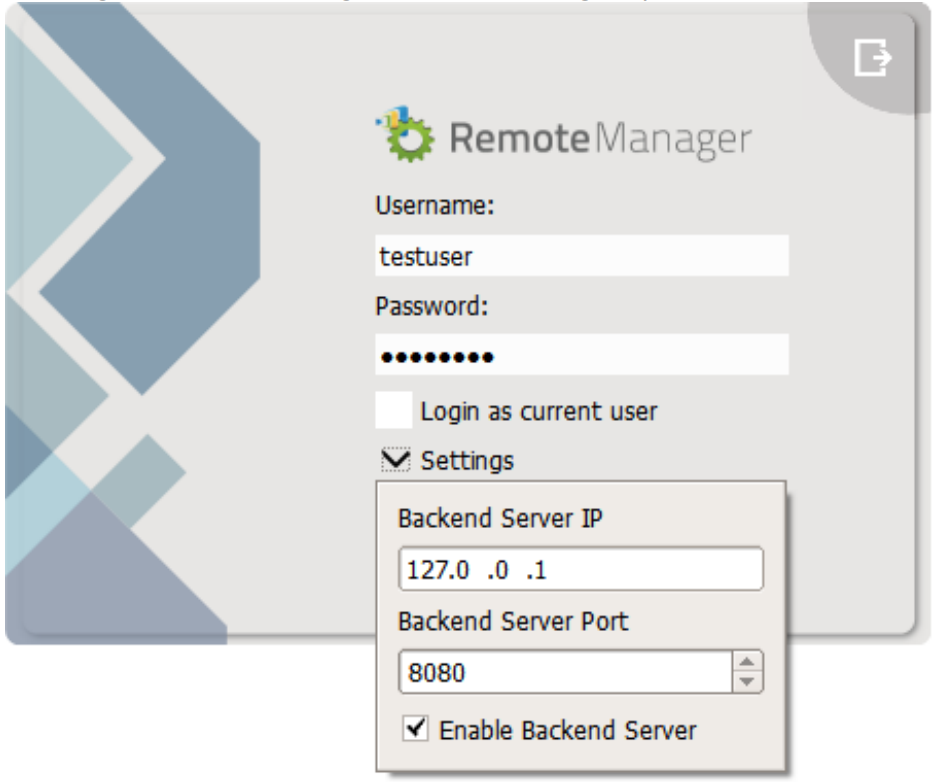
Step3. Enter IP address and port number of Remote Manager DB Server (Backend Server). You can simply input “127.0.0.1” if the server is on the same machine with Remote Manager.
Check the Login as current user box if you use SSO login.
Step4. Restart the application and then the login page shows up. Enter your login credential to continue.
If you want to change server settings, click Setting option to do so.
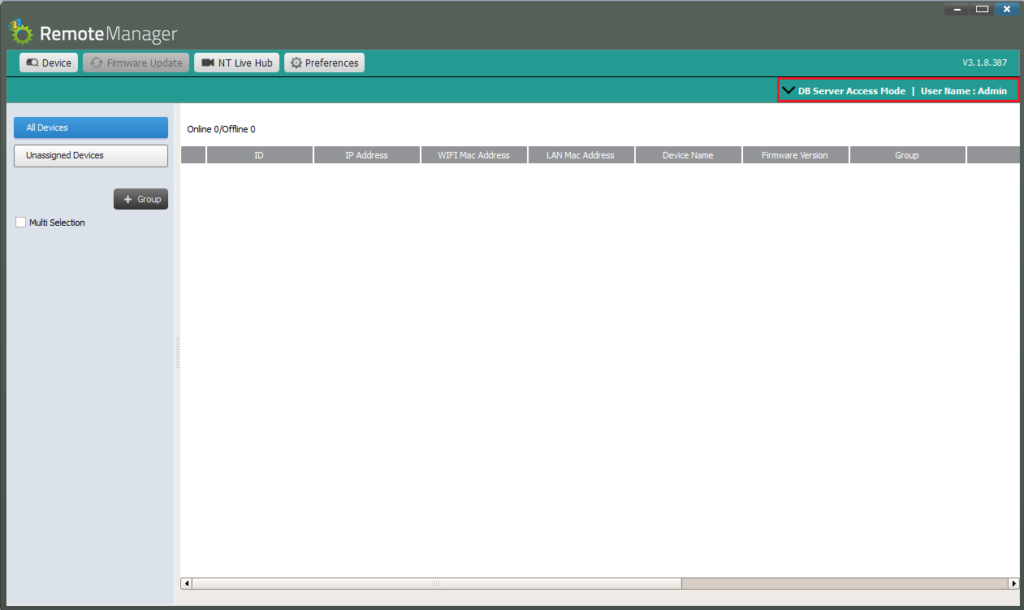
Step5. Once you log in successfully, you should see the following main screen, which has a slightly different look from the “Standalone Mode” Remote Manager.